PROJRCT 2 - DYNAMO STUDY
Overview
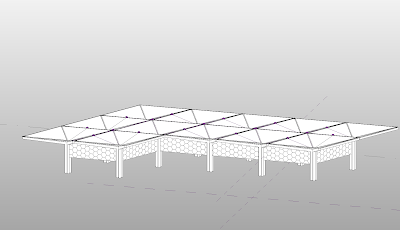
Project 2 builds on my Project 1 by adding Dynamo-controlled project-level parameters. These parameters achieve two main objectives:
Southern Canopy: Sun-Driven Louvers
Adding sun-driven louvers under the southern canopy roof modules, which cover open spaces.
Northern Canopy: Room Function-Driven Adaptive Facade
Implementing room function-driven adaptive facade modules under the northern canopy, covering enclosed spaces.
Southern Canopy: Sun-Driven Louvers
Step 1: Creating the Louver Family
The sun-driven louvers are created using an adaptive louver family.
The louvers are defined by two adaptive points at the start and end. Parameters control their size and rotation angle.
The Louver Angle is set as an instance parameter so each louver can rotate independently.
Step 2: Positioning Louvers in the Project
In Dynamo, the louvers' start and end points are defined based on the triangular roof panels.
First, the roof geometry is extracted.
Then, using Curve.PlaneAtParameter node, to create planes along the base edges of the triangular panels. These planes intersect with the geometry, generating a list of lines for each panel.
The number of lines is dynamically controlled using an integer slider.
Finally, the start and end points of each line are obtained, and the adaptive louvers are placed based on these points.
Step 3: Setting Sun-Driven Louver Angles
The louver angle changes based on the angle between the panel's normal vector and the sun's direction.
Panel normals and the sun direction are translated to lines, and the angle between the normal are obtained.
And the louvers’ rotation rules are defined using a code block.
Step 4: Testing
We can test if the louvers work well in project. The current sun setting is at 8 AM in College Station, the louvers are relatively open to allow soft sunlight to pass through. At noon, the louvers rotate to block direct sunlight while still allowing some light to enter.
The list in Dynamo shows how each louver’s angle changes with time.
Northern Canopy: Room Function-Driven Adaptive Facade
The northern canopy features a facade made of hexagonal modules. Each module consists of six triangular panels with adjustable angles to control openness.
Step 1: Dividing the Surface in Family
In the family, the massing’s surfaces are divided with a hexagon pattern.
However, Since Revit's default hexagon pattern is not a perfect hexagon, I remade one to ensure accurate hexagonal geometry.
The adaptive Hexagon panel family is also created based on this pattern, with the angle parameter set as an instance parameter.
Step 2: Position Hexagon Panels in Project
The control points of all hexagonal patterns are exported to Excel using Dynamo.
After cleaning the Excel file, the control points are re-imported into the project. The adaptive panel family is placed at the specified locations.
Step 3: Defining and Room Names
Next, the rooms are arranged and defined in the project. Each room should be assigned a name. There are 14 rooms with 7 different room names in this project.
Step 4: Determining the Panels -Rooms Relations
First, the center point of each panel is calculated based on its six control points.
Then, I use The DoesInsideRoom node to cross-check if each panel’s center point falls within a specific room.
This process generates a Boolean list. The indices of True values indicate which room each panel belongs to.
Step 5: Setting Panel Rotation Rules
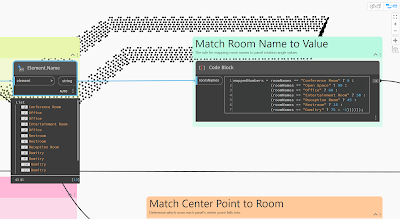
The room names are obtained. Combining with the indices of true values, we can match each point to each room name.
Then, a code block is used to define angle rotation rules for the panels. This approach simplifies future adjustments, allowing easy changes to room numbers, names, or panel rotation rules without creating plenty of filter and if nodes for each room.
Step 6: Testing
We can test it in the project and see how the panels on the façade open differently for each room. If we move the walls in the project the openness of the facade panels will change correspondingly.
During the design phase, we might change the room layout several times. This method helps us avoid rebuilding each façade module each time.
INTERACTION WITH AI
In this Dynamo exercise, I interacted with AI to address various challenges in creating parametric models. When faced with complex operational requirements, the AI often suggested solutions using code blocks or Python scripts instead of intricate node-based workflows. This approach simplified the logic and reduced the need for extensive node connections, making it easier to implement advanced features while maintaining flexibility in customization.
When I asked, "Please generate an image based on the image. The point is the Canopy structure and Hexagon Panels with different openness on the facade", ChatGPT generated:


Comments
Post a Comment